Author: daniel

  • Pushing a Local Project to GitHub

    Pushing a Local Project to GitHub

    As I’ve been delving deeper into JavaScript, I’ve found myself starting local projects, wanting to get into the habit of making my commits and pushing them to GitHub. So, you’ve created a folder for your little project; now how do you get it onto GitHub?

    Initializing the Local Repo in Git

    Once you’ve created your project’s folder, you’ll then want to open Terminal and CD into the folder. Now you’ll initialize the repo in Git with the following command:

    git init -b main

    At this this time, you can then create a file new file called .gitignore in TextEdit on a macOS, or nano/vim/vi in Terminal. This file allows you to specify various files, folders, or filetypes to ignore when adding files and making commits. Here is an example of what you can put in you .gitignore file:

    # Ignore Mac system files
    .DS_store
    
    # Ignore all zip files
    *.zip
    
    # Ignore tmp folder
    /tmp

    Now you can add all files in the local project folder to git with the following command:

    git add .

    The first commit can bow be made by running:

    git commit -m “The first commit”

    Creating the GitHub Repository

    We’re not ready to create the repository on GitHub that will be used to push the local commits to.
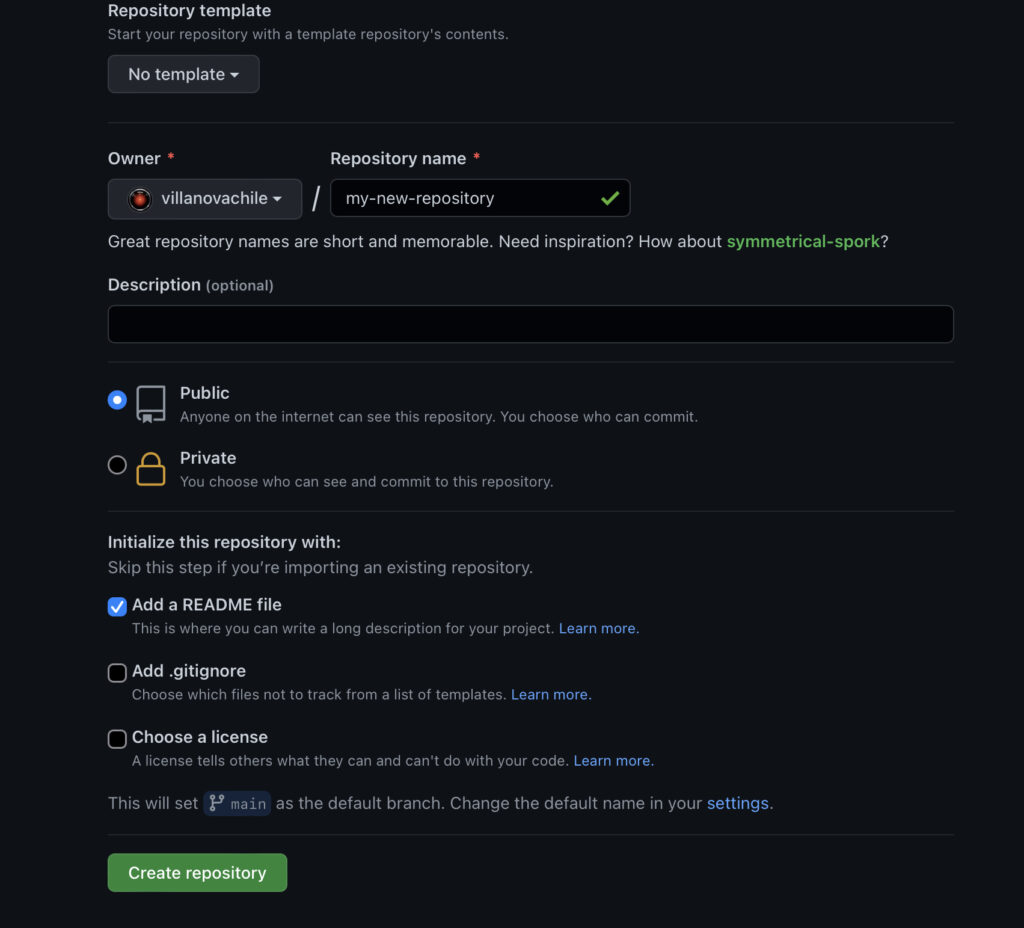
    GitHub repository creation

    Once that has been created, you’ll then want to get the SSH link to your repository. This can be done by navigating to your newly created repository on GitHub, then clicking the green Code button, choosing the SSH option, and clicking the copy button.
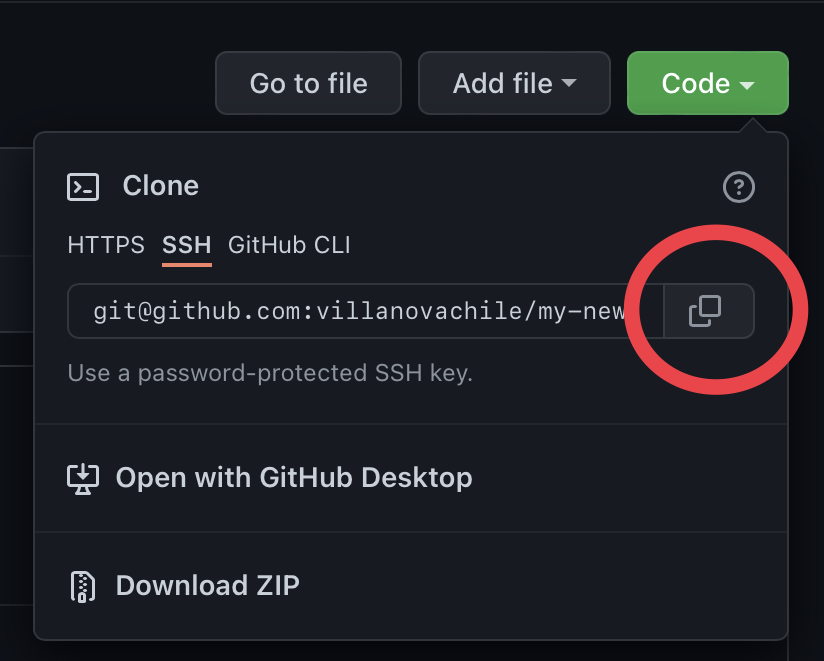
    SSH link

    The HTTPS link will work just fine, however, it will prompt you for your login/password every time you make changes. If you have have your SSH public key set up as described in this article, then you’ll want to use the SSH link.

    Pushing the Project to GitHub

    The next step will be to add the URL for the remote repository, which is where you want the files to be pushed to on GitHub. This can be done by running, and pasting the SSH link we copied from above.

    git remote add origin <SSHLink>

    You can verify the URL by then entering:

    git remote -v

    The final step will be to push the local files to your GitHub repository by running:

    git push -u origin main

    If you’ve selected the option to create a README when creating your repository on GitHub, then you may see this message:

     ! [rejected]        main -> main (fetch first)
    error: failed to push some refs to 'github.com:villanovachile/my-new-repository.git'
    hint: Updates were rejected because the remote contains work that you do
    hint: not have locally. This is usually caused by another repository pushing
    hint: to the same ref. You may want to first integrate the remote changes
    hint: (e.g., 'git pull ...') before pushing again.
    hint: See the 'Note about fast-forwards' in 'git push --help' for details.
    

    This essentially means that since there is a file in the remote repository that is not present in the local repository, you must first make a pull by running:

    git pull origin main

    If you see the error fatal: refusing to merge unrelated histories then you can can add the --allow-unrelated-histories tag such as:

    git pull origin main --allow-unrelated-histories

    You should now see any existing files from GitHub in your local repo folder, and you can run the following push command again:

    git push -u origin main

    You should now be able to refresh your GitHub repository and see your local files!
  • Switch Statements

    Switch Statements

    The conditional if, else, and else if statements are some of the most powerful and often used statements in programming. As a teenager playing around with Visual Basic, these statements were the building blocks into my understanding of programming logic. So to help me cement this in my brain, I’m writing a blog post about it to document my journey!

    If Statements

    In my journey into full stack JavaScript development, I was delighted to learn more about switch statements. Like if statements, switch statements are conditional statements that check if an argument is true. When if statements are combined with else if statements, each else if condition allows a function to be performed based on each condition. Appending an else statement at the end makes the last function a default condition, meaning if all other conditions fail, then the default condition would be met and that last function would run.

    Example:

    if (condition1 is true) {
         runThisFunction1();
    } else if (condition2 is true) {
         runThisFunction2();
    } else if (condition3 is true) {
         runThisFunction3();
    } else {
         runThisDefaultFunction();
    }

    If you want to run a function whether any of the conditions are met, then you’ll want to use an OR operator to separate each condition, represented by pipes ||. Using pipes in an if statement means that if any of the conditions test true (or are met), then a function will run. This can be helpful when wanting to group conditions, such as in the following:

    if (condition1 true || condition2 true  || condition3 true) {
         runThisFunction1;
    } else {
         runThisFunction2;
    }

    Switch Statements

    This now brings us to switch statements. Switch statements can be used in place of else if conditional statements to test if a condition is true, and if so, then a function can be run under each condition.

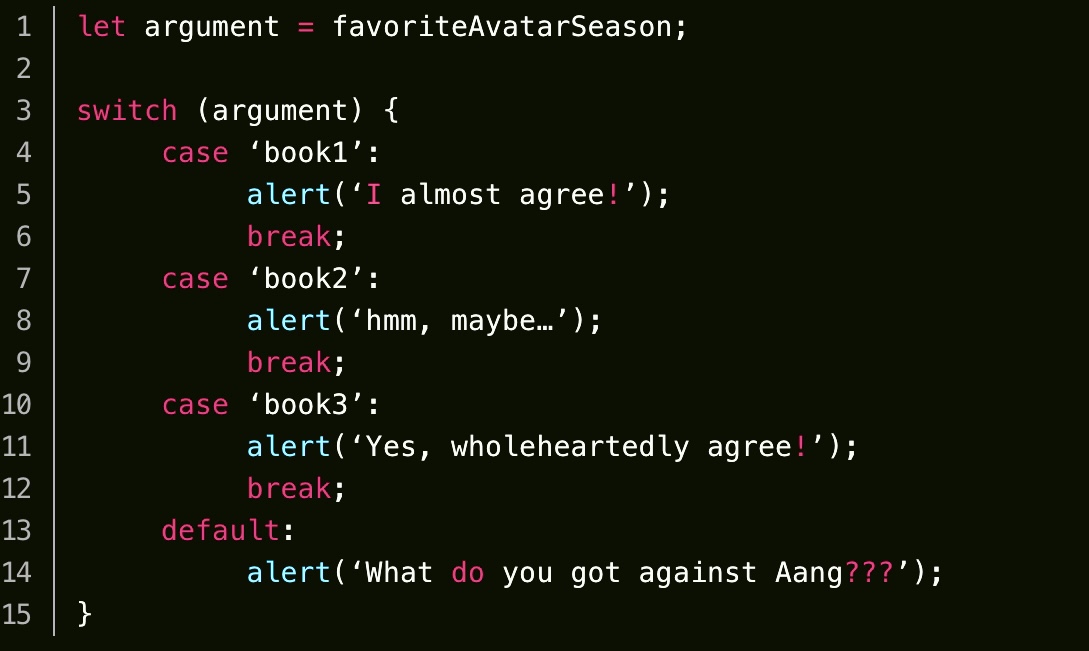
    The switch statement relies on an argument or expression to test, and then uses a case clause to determine whether an argument tests true, and if so, what function or action to take. When using switch statements, it is important to add a break statement to each case clause to stop the switch statement from moving on to the next case. If a break statement is not used, it will run the next case clause whether the condition tests true or not, until it reaches the end, or until runs into another case clause with a break statement.

    let argument = favoriteAvatarSeason;
    
    switch (argument) {
         case ‘book1’: 
              alert(‘I almost agree!’);
              break;
         case ‘book2’:
              alert(‘hmm, maybe…’);
              break;
         case ‘book3’:
              alert(‘Yes, wholeheartedly agree!’);
              break;
         default:
              alert(‘What do you got against Aang???’);
    }

    In the case above, the default clause does not need a break statement, because it only runs if none of the other cases test true,

    What if you can’t decide between Book 1 and Book 3, and you refuse to compromise? Switch statements have you covered!

    let argument = favoriteAvatarSeason;
    
    switch (argument) {
         case ‘book1’: 
         case ‘book3’:
              alert(‘Yes, wholeheartedly agree!’);
              break;
         case ‘book2’:
              alert(‘hmm, maybe…’);
              break;
         default:
              alert(‘What do you got against Aang???’);
    }

    In the switch statement above, the line alert(‘Yes, wholeheartedly agree!’); will run if either case ’book1’ or case ’book2’ conditions are met.

    Else If vs Switch Statements

    Although both else if and switch statements can both get the job done, I think the takeaway here is knowing when to use one or the other. If you have numerous conditions, such as 5 or more, then it might make more sense to use switch statements, as it would be easier to read, especially if grouping conditions together. Are there any situations in JavaScript where an else if statement or switch statement can perform a function or test that the other can not? Let me know your thoughts!

  • Setting Up Git & Connecting to GitHub on macOS

    Setting Up Git & Connecting to GitHub on macOS

    One of the first things we learn as part of our journey into JavaScript with The Odin Project is setting up Git and connecting to GitHub. As I’m sure many others do, I find myself working on multiple devices, and continuously referring back to The Odin Project modules to recall the steps and terminal commands.

    I figured this would be a good place to make a quick guide that I can conveniently refer to when needed.

    1. Prerequisites

    First you will need to install Homebrew. The instructions for that can be found here.

    Once all the dependents Homebrew has been installed, you can install Homebrew with the following command:

    /bin/bash -c "$(curl -fsSL https://raw.githubusercontent.com/Homebrew/install/HEAD/install.sh)"
    2. Installing & Configuring git

    Although macOS comes with Git preinstalled, you can update Git by running the following command:

    brew install git

    Next we need to configure Git to match the information on your GitHub account. This can be done by running the following commands:

    git config --global user.name "Your Name"
    git config --global user.email "[email protected]"

    You can verify the config above by running:

    git config --get user.name
    git config --get user.email

    You can then set the default branch to Main (recently standardized) by running:

    git config --global init.defaultBranch main
    3. Connecting Git to GitHub with a SSH Public Key

    We are now ready to create a public SSH key and connect Git to your GitHub.com account!

    First, create a Git SSH key by running the following command (It’s important that your email matches your GitHub email.):

    ssh-keygen -t ed25519 -C <youremail>

    Once that has been done, you can then copy the SSH public key to your clipboard by running:

    pbcopy < ~/.ssh/id_ed25519.pub

    Now you can log onto GitHub.com, click on your profile picture, then click Settings, and SSH and GPG Keys, or by clicking here. Once there, click New SSH Key, enter a title that identifies the device you’re adding the SSH key for and paste the contents into the key section.

    You can then test your SSH key by running

    If successful, you’ll see a message like:

    > Hi <em>username</em>! You've successfully authenticated, but GitHub does not
    > provide shell access.